
2 posts tagged with "OpenAI"

View All Tags

· 6 min read
Anuun Chinbat

THE PROBLEM

There are two types of people: those who hoard thousands of unread emails in their inbox and those who open them immediately to avoid the ominous red notification. But one thing unites us all: everyone hates emails. The reasons are clear:

  • They're often unnecessarily wordy, making them time-consuming.
  • SPAM (obviously).
  • They become black holes of lost communication because CC/BCC-ing people doesn't always work.
  • Sometimes, there are just too many.

So, this post will explore a possible remedy to the whole email issue involving AI.


THE SOLUTION

Don't worry; it's nothing overly complex, but it does involve some cool tools that everyone could benefit from.

💡 In a nutshell, I created two flows (a main flow and a subflow) in Kestra :

  • The main flow extracts email data from Gmail and loads it into BigQuery using dlt, checks for new emails, and, if found, triggers the subflow for further processing.
  • The subflow utilizes OpenAI to summarize and analyze the sentiment of an email, loads the results into BigQuery, and then notifies about the details via Slack.

Just so you're aware:

  • Kestra is an open-source automation tool that makes both scheduled and event-driven workflows easy.
  • dlt is an open-source library that you can add to your Python scripts to load data from various and often messy data sources into well-structured, live datasets.
tip

Wanna jump to the GitHub repo?
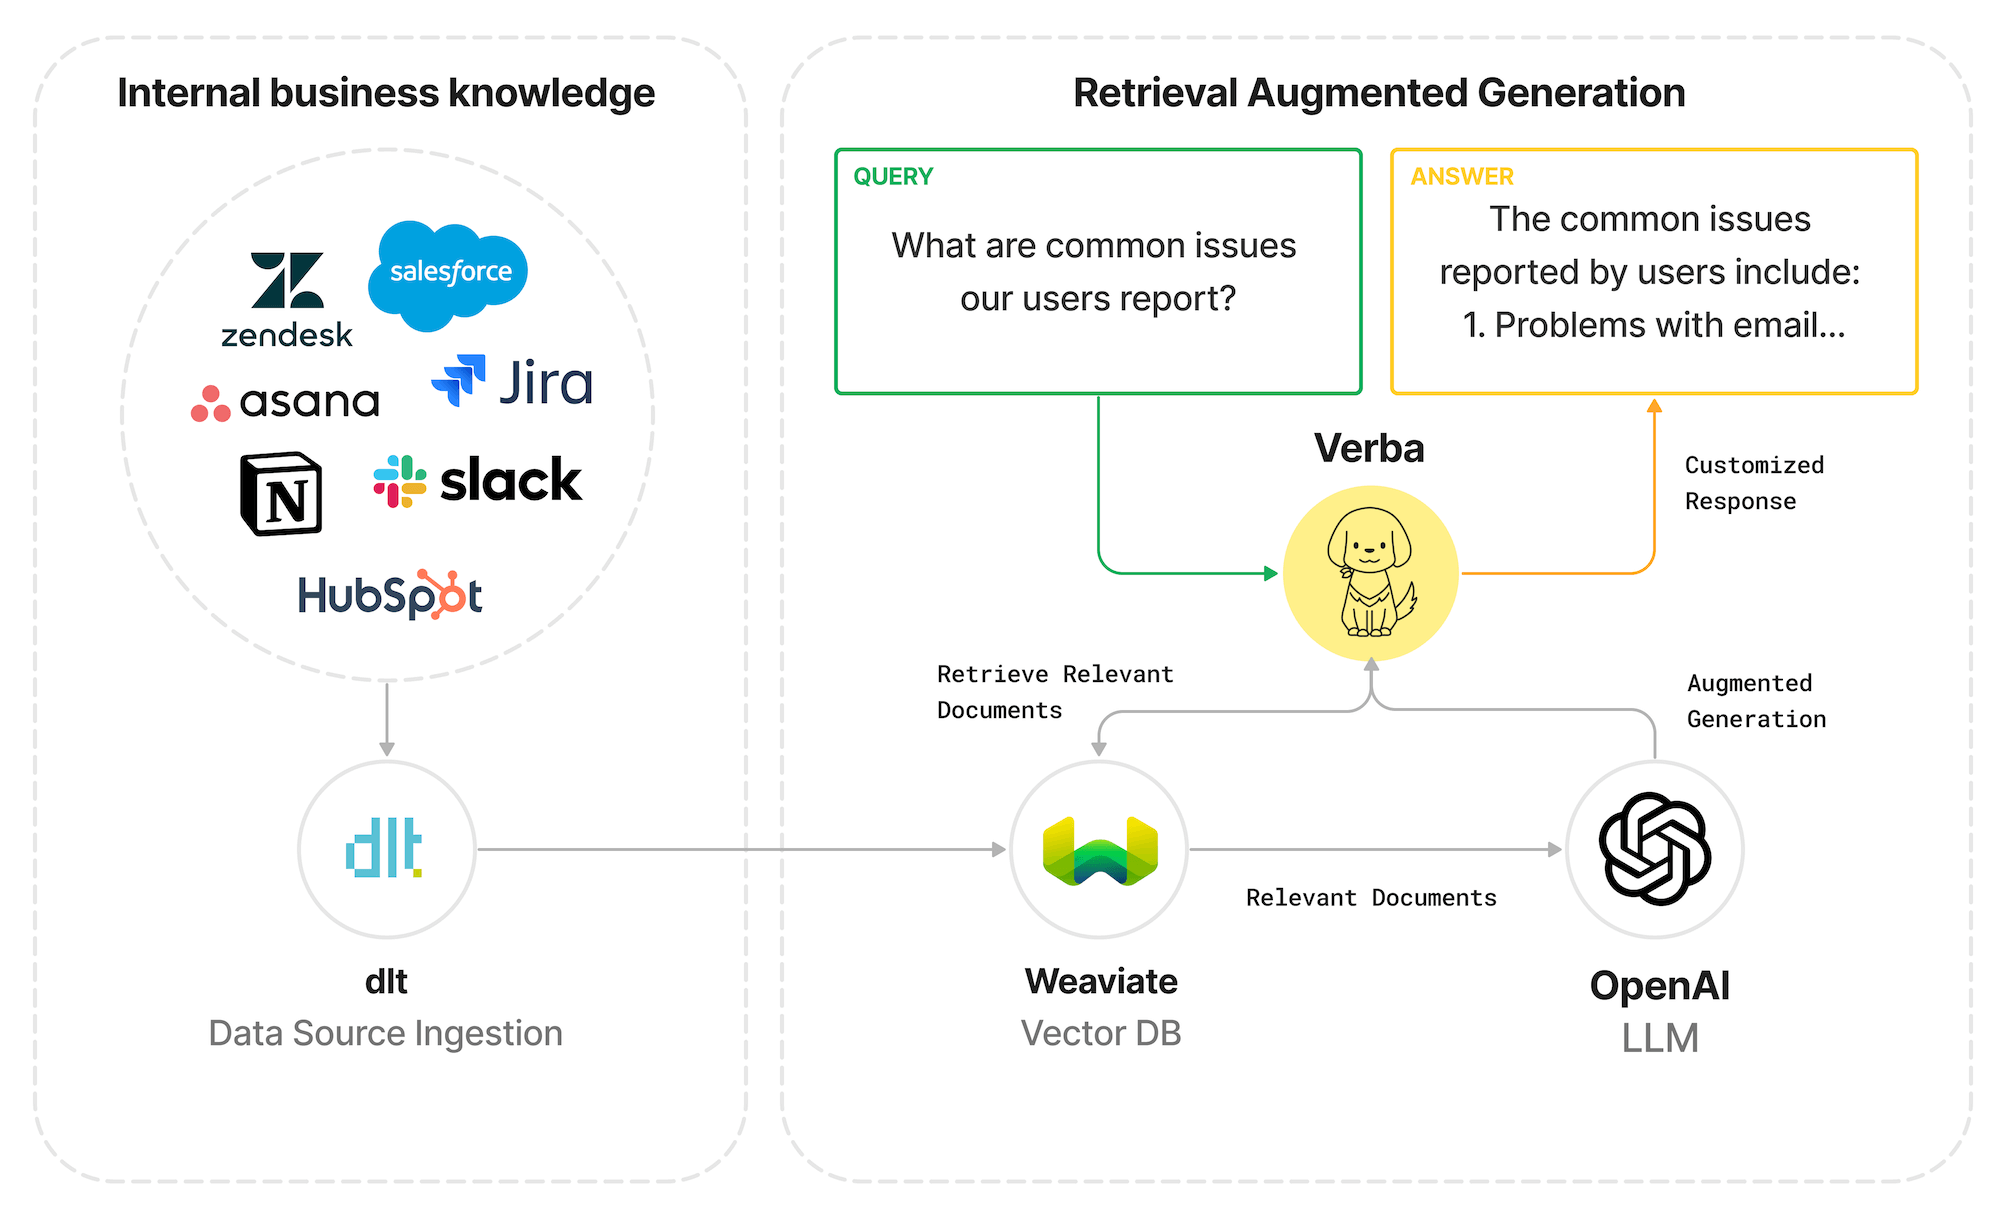

HOW IT WORKS

To lay it all out clearly: Everything's automated in Kestra, with hassle-free data loading thanks to dlt, and the analytical thinking handled by OpenAI. Here's a diagram to help you understand the general outline of the entire process.

overview

Now, let's delve into specific parts of the implementation.

The environment:

💡 The two flows in Kestra are set up in a very straightforward and intuitive manner. Simply follow the Prerequisites and Setup guidelines in the repo. It should take no more than 15 minutes.

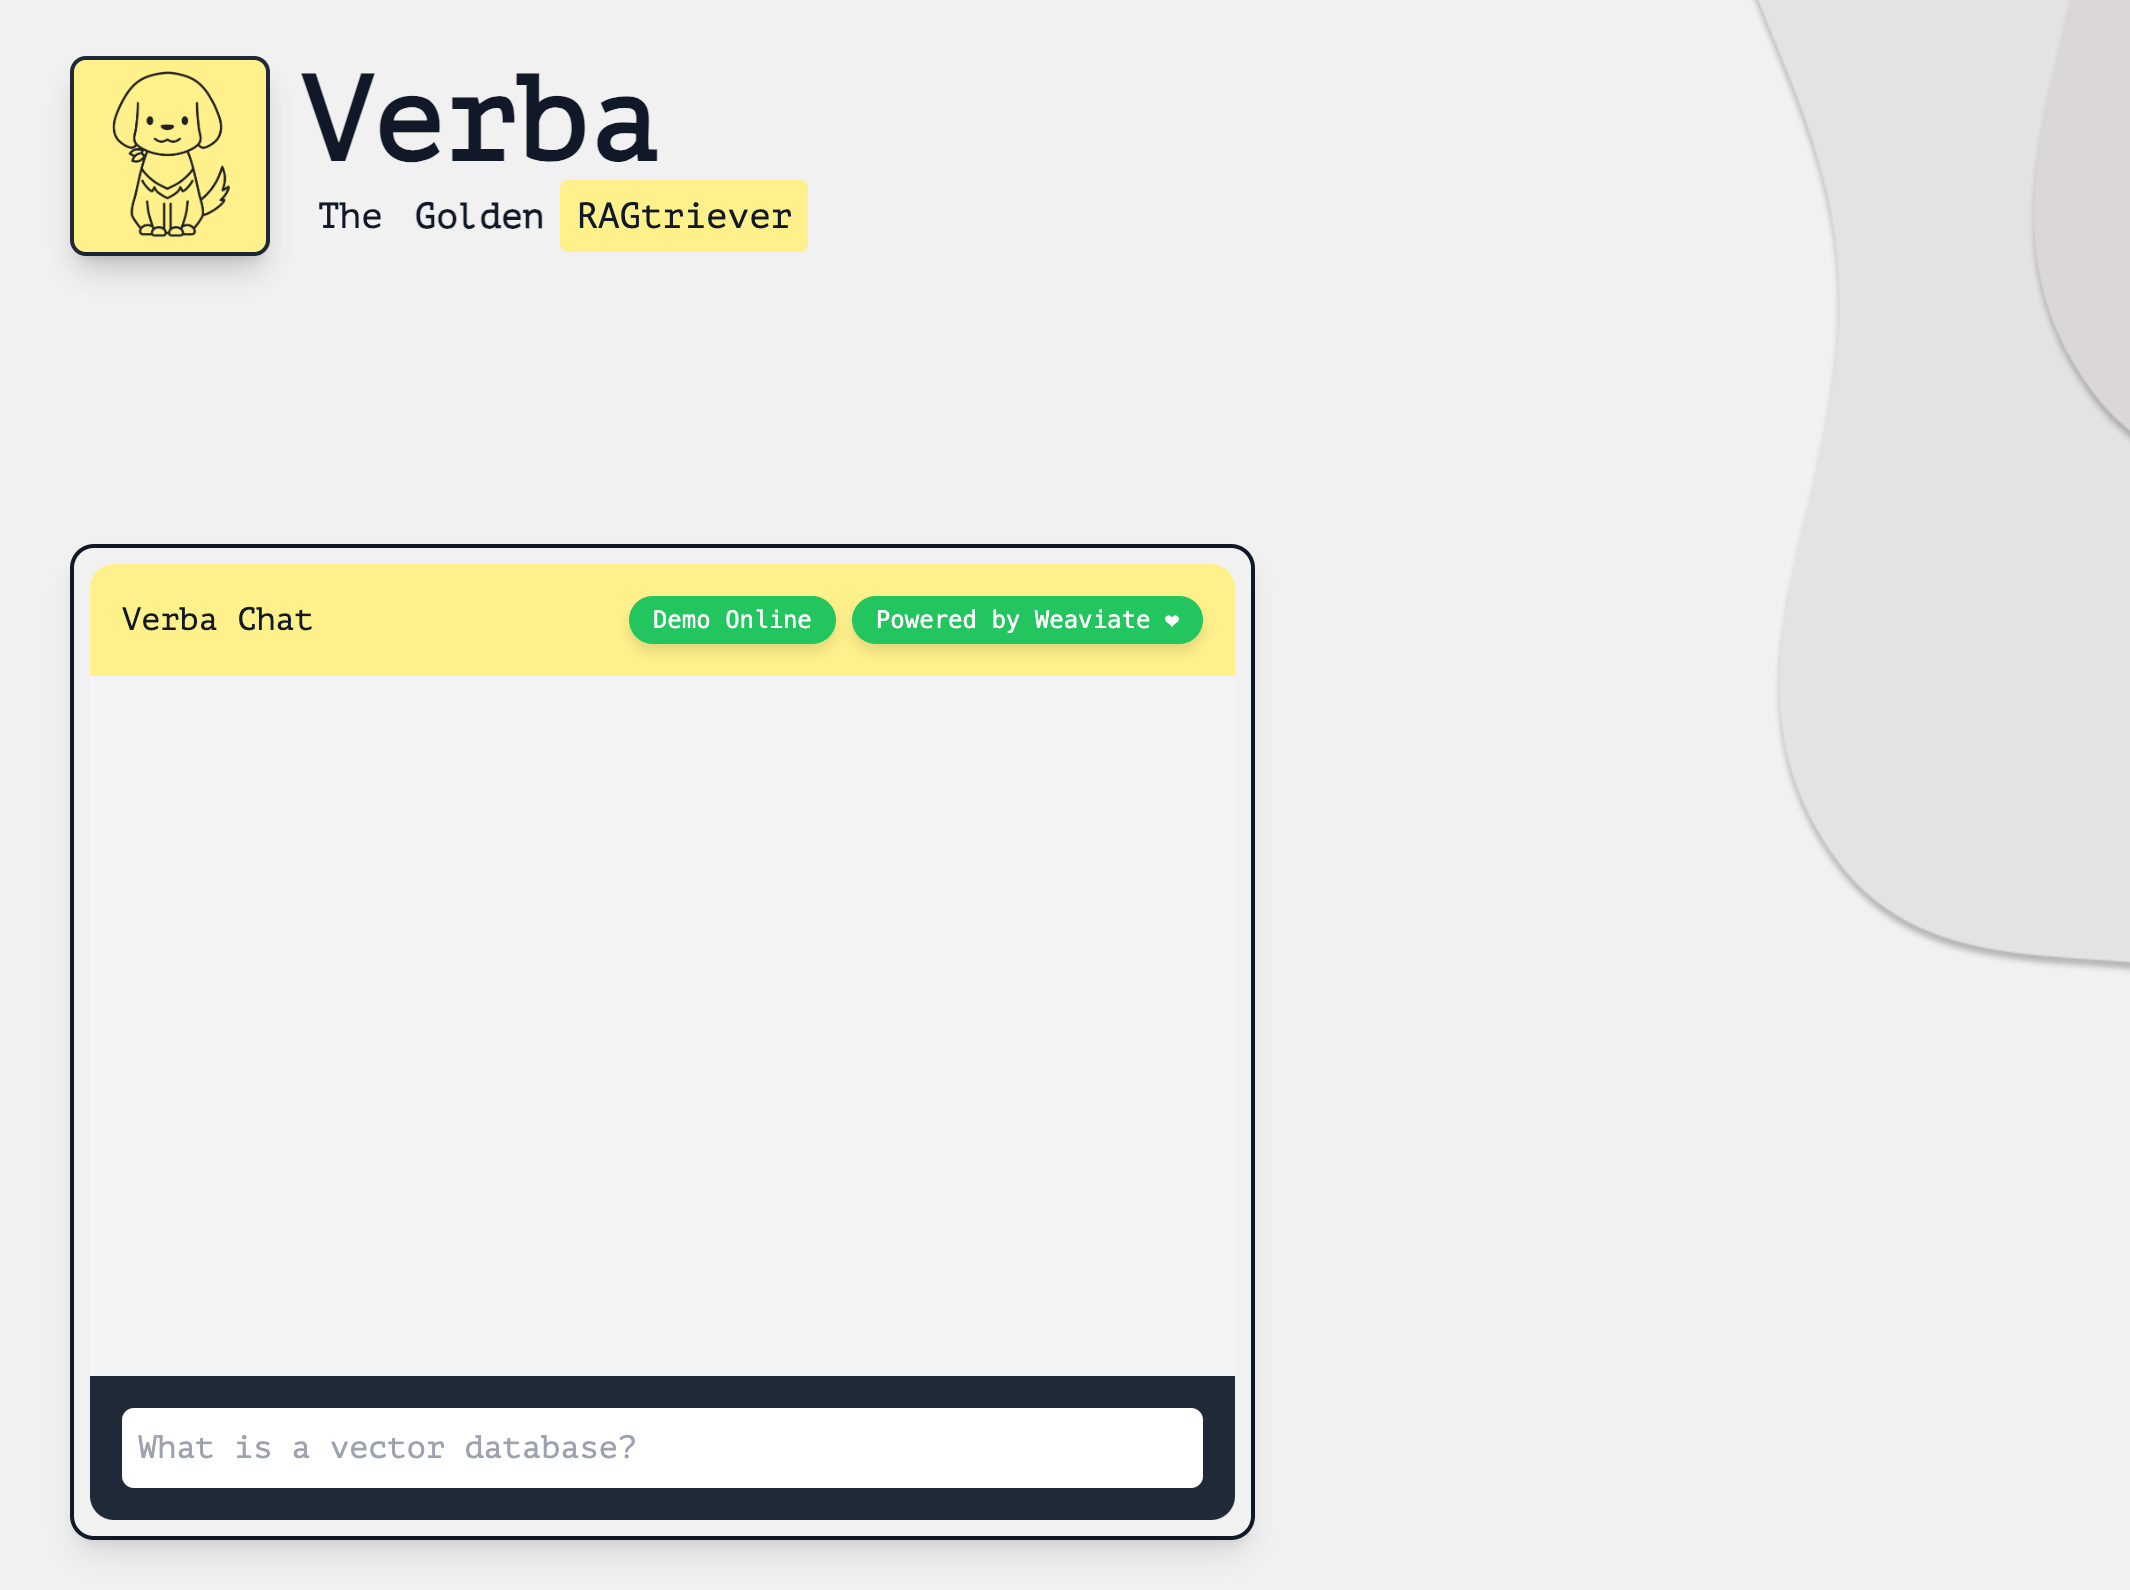
Once you’ve opened http://localhost:8080/ in your browser, this is what you’ll see on your screen:

Kestra

Now, all you need to do is create your flows and execute them.

The great thing about Kestra is its ease of use - it's UI-based, declarative, and language-agnostic. Unless you're using a task like a Python script, you don't even need to know how to code.

tip

If you're already considering ways to use Kestra for your projects, consult their documentation and the plugin pages for further insights.

The data loading part

💡 This is entirely managed by dlt in just five lines of code.

I set up a pipeline using the Inbox source – a regularly tested and verified source from dlt – with BigQuery as the destination.

In my scenario, the email data doesn't have nested structures, so there's no need for flattening. However, if you encounter nested structures in a different use case, dlt can automatically normalize them during loading.

Here's how the pipeline is defined and subsequently run in the first task of the main flow in Kestra:

# Run dlt pipeline to load email data from gmail to BigQuery
pipeline = dlt.pipeline(
pipeline_name="standard_inbox",
destination='bigquery',
dataset_name="messages_data",
full_refresh=False,
)

# Set table name
table_name = "my_inbox"
# Get messages resource from the source
messages = inbox_source(start_date = pendulum.datetime(2023, 11, 15)).messages
# Configure the messages resource to get bodies of the emails
messages = messages(include_body=True).with_name(table_name)
# Load data to the "my_inbox" table
load_info = pipeline.run(messages)

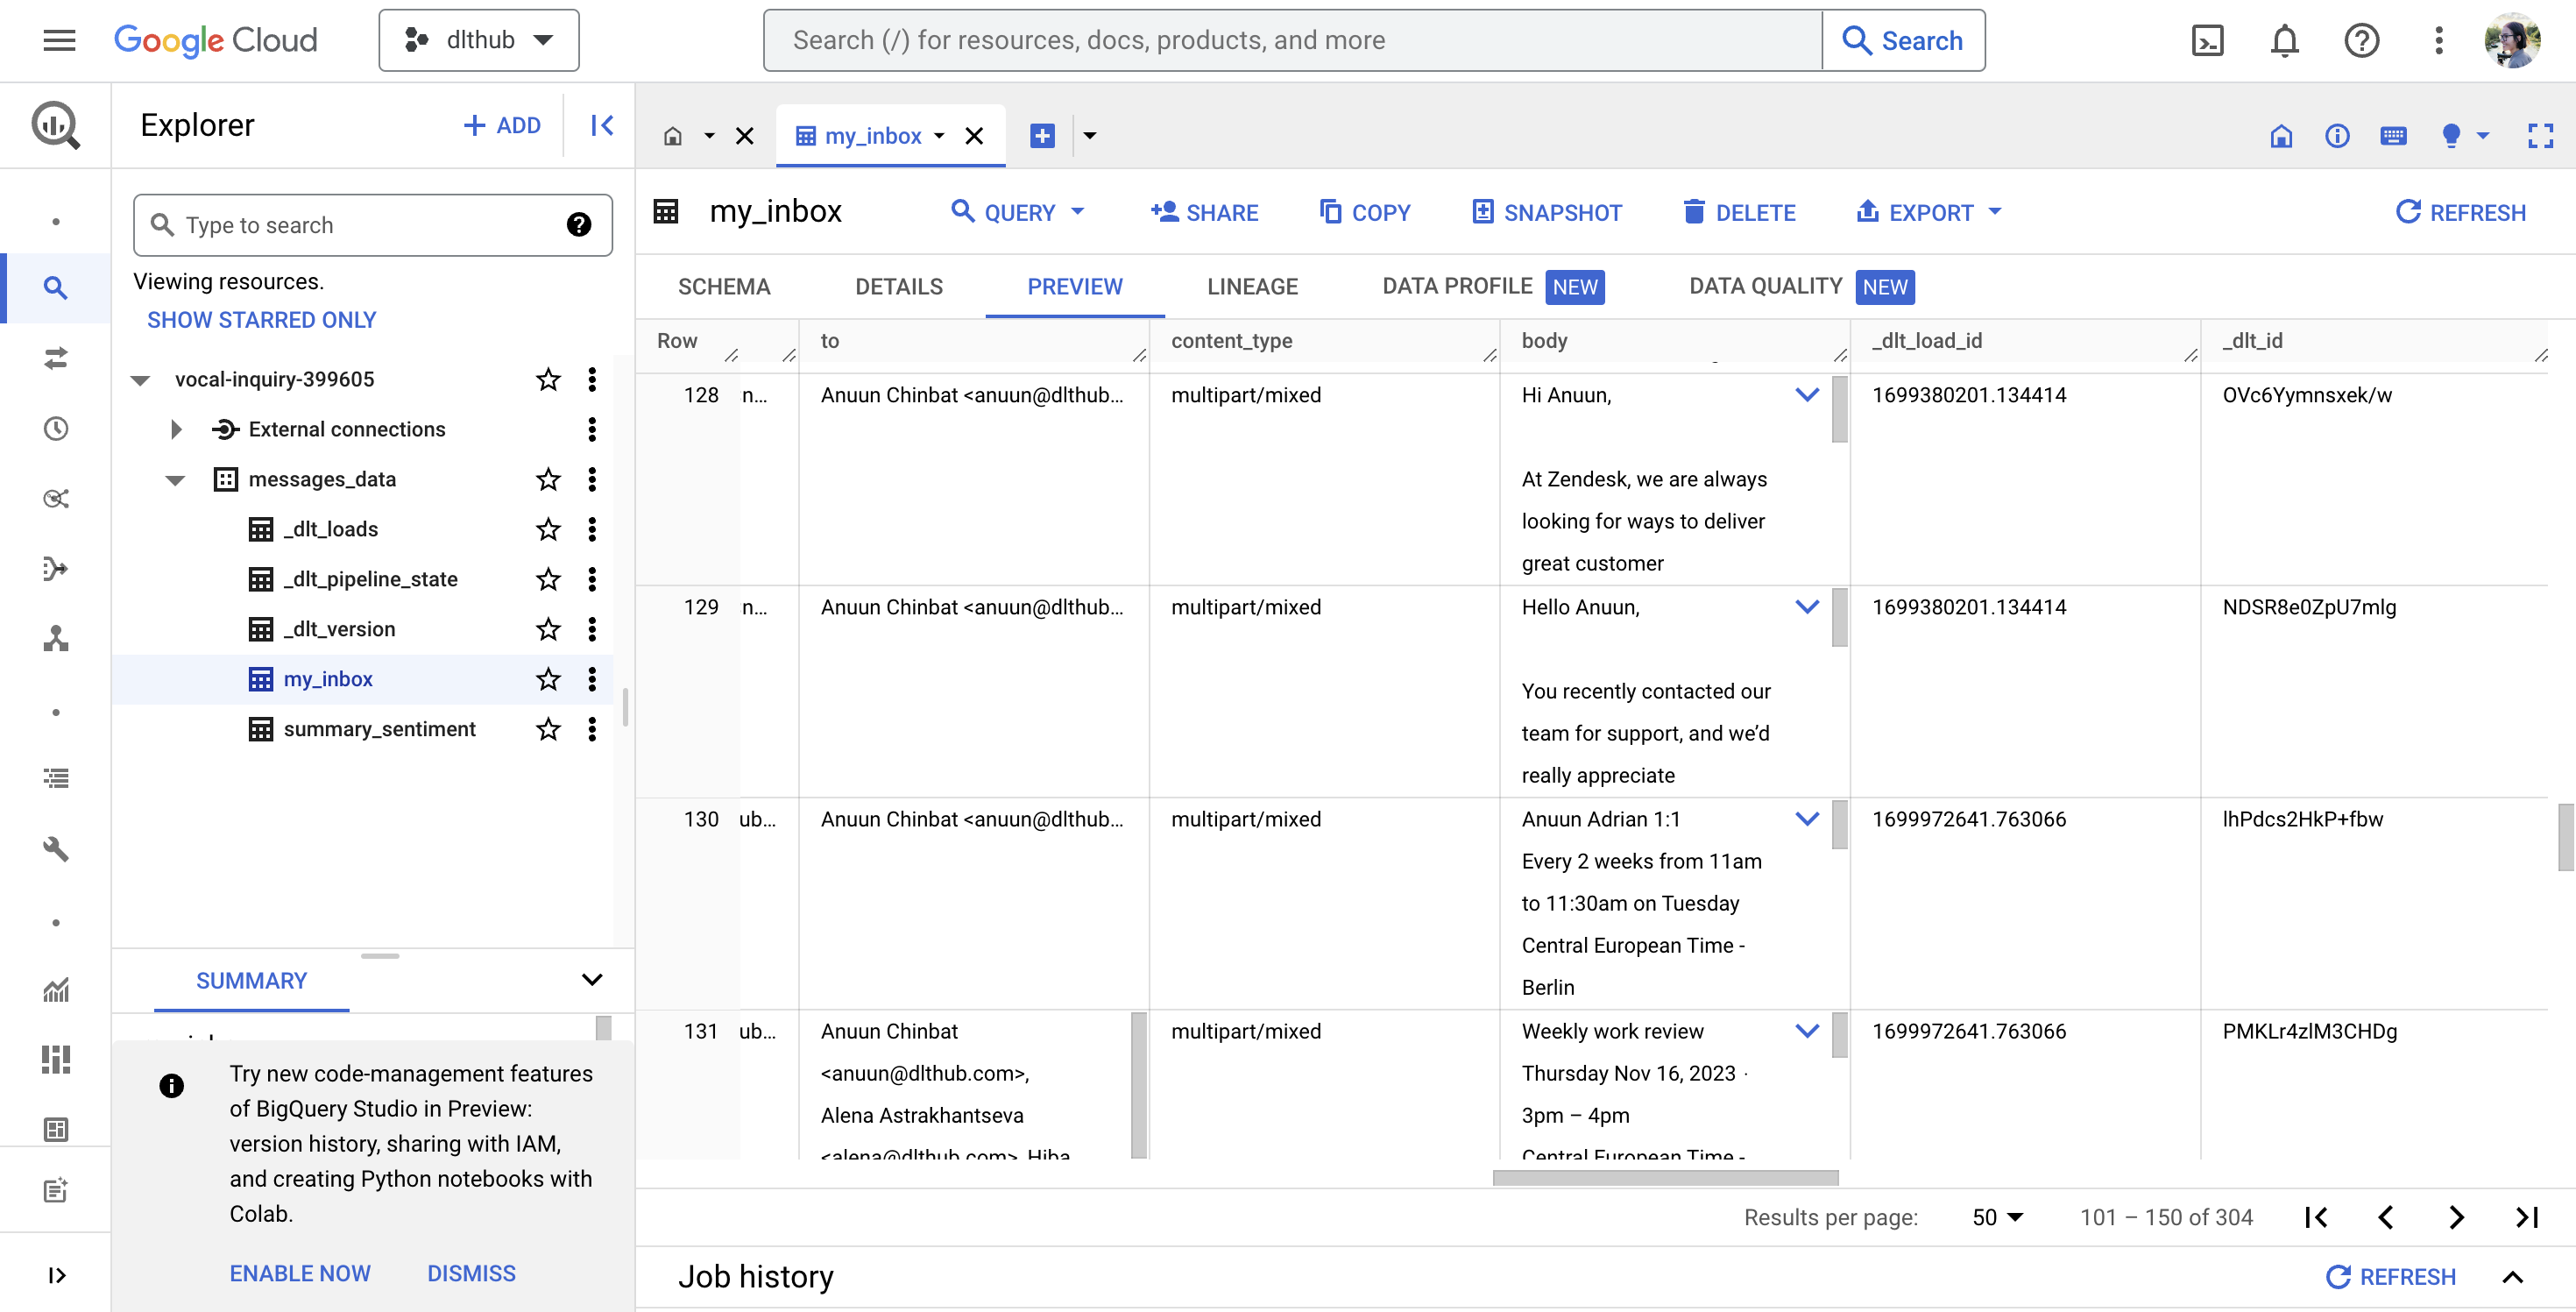
In this setup ☝️, dlt loads all email data into the table “my_inbox”, with the email body specifically stored in the “body” column. After executing your flow in Kestra, the table in BigQuery should appear as shown below:

bigquery_my_inbox

tip

This implementation doesn't handle email attachments, but if you need to analyze, for instance, invoice PDFs from your inbox, you can read about how to automate this with dlt here.

The AI part

💡 In this day and age, how can we not incorporate AI into everything? 😆

But seriously, if you're familiar with OpenAI, it's a matter of an API call to the chat completion endpoint. What simplifies it even further is Kestra’s OpenAI plugin.

In my subflow, I used it to obtain both the summary and sentiment analysis of each email body. Here's a glimpse of how it's implemented:

- id: get_summary
type: io.kestra.plugin.openai.ChatCompletion
apiKey: "{{ secret('OPENAI_API') }}"
model: gpt-3.5-turbo
prompt: "Summarize the email content in one sentence with less than 30 words: {{inputs.data[0]['body']}}"
messages: [{"role": "system", "content": "You are a tool that summarizes emails."}]
info

Kestra also includes Slack, as well as BigQuery plugins, which I used in my flows. Additionally, there is a wide variety of other plugins available.

The automation part

💡 Kestra triggers are the ideal solution!

I’ve used a schedule trigger that allows you to execute your flow on a regular cadence e.g. using a CRON expression:

triggers:
- id: schedule
type: io.kestra.core.models.triggers.types.Schedule
cron: "0 9-18 * * 1-5"

This configuration ensures that your flows are executed hourly on workdays from 9 AM to 6 PM.


THE OUTCOME

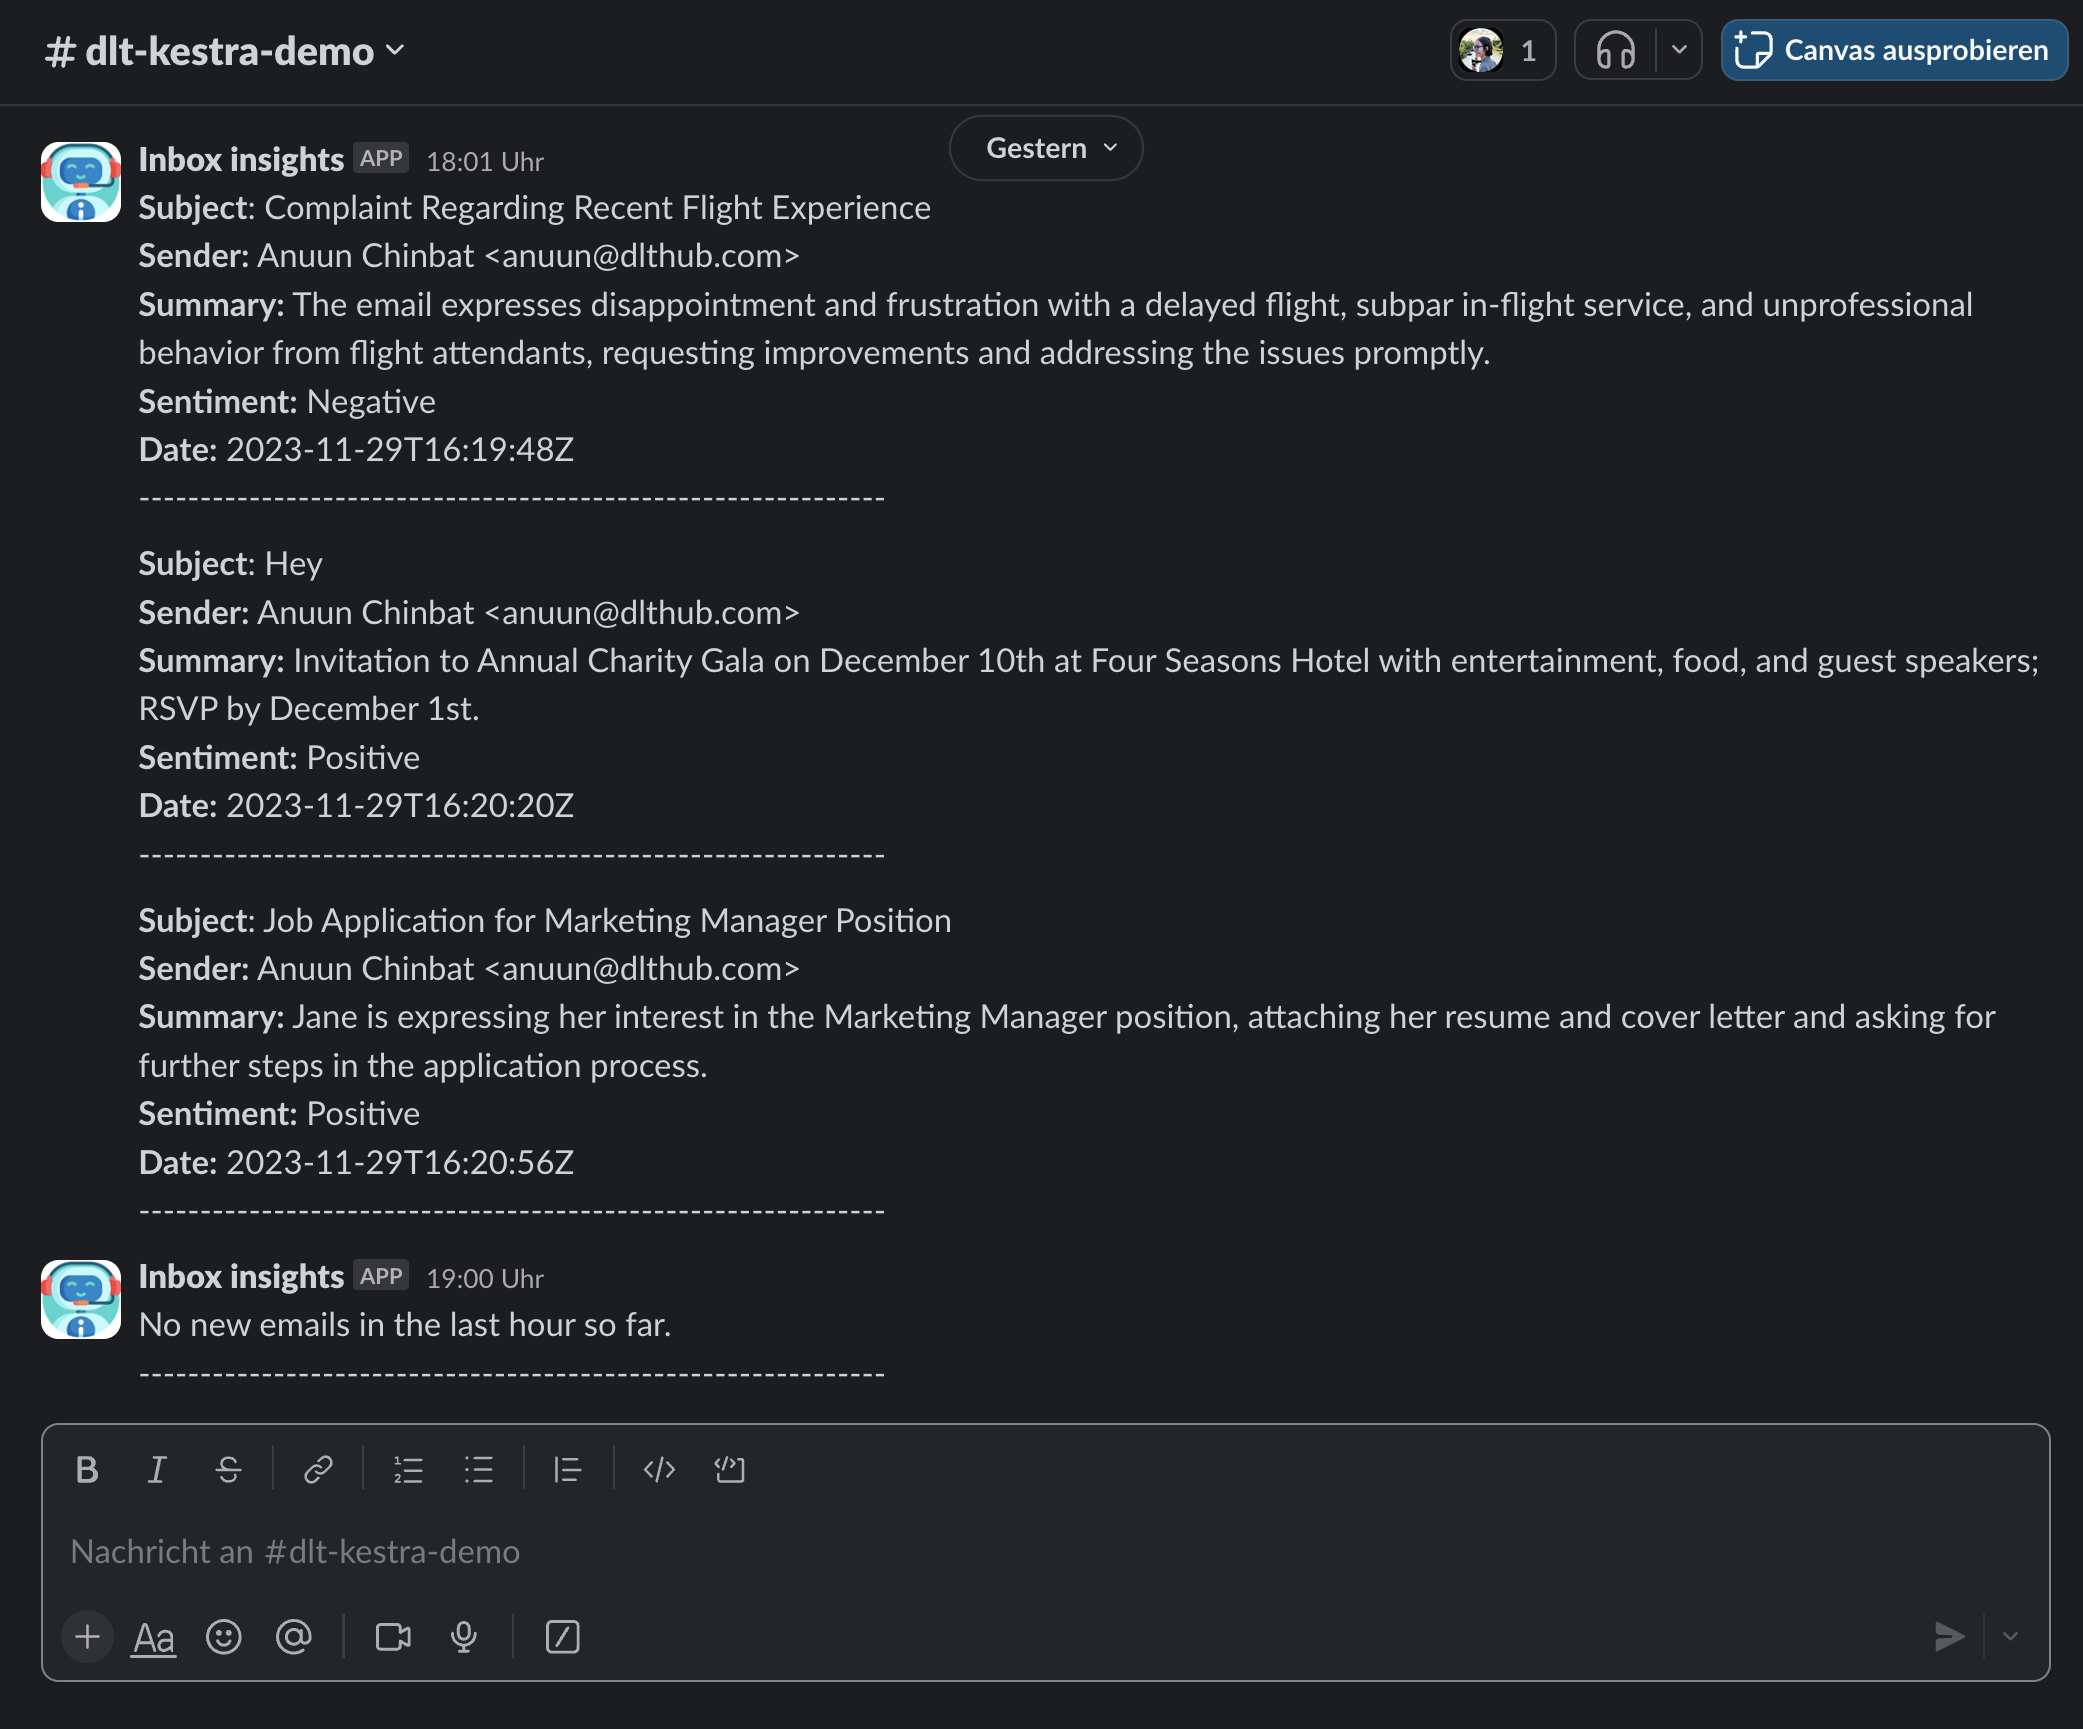
A Slack assistant that delivers crisp inbox insights right at your fingertips:

slack.png

And a well-organized table in BigQuery, ready for you to dive into a more complex analysis:

bigquery_test.png

In essence, using Kestra and dlt offers a trio of advantages for refining email analysis and data workflows:

  1. Efficient automation: Kestra effortlessly orchestrates intricate workflows, integrating smoothly with tools like dlt, OpenAI, and BigQuery. This process reduces manual intervention while eliminating errors, and freeing up more time for you.
  2. User-friendly and versatile: Both Kestra and dlt are crafted for ease of use, accommodating a range of skill levels. Their adaptability extends to various use cases.
  3. Seamless scaling: Kestra, powered by Kafka and Elasticsearch, adeptly manages large-scale data and complex workflows. Coupled with dlt's solid data integration capabilities, it ensures a stable and reliable solution for diverse requirements.

HOW IT COULD WORK ELSEWHERE

Basically, you can apply the architecture discussed in this post whenever you need to automate a business process!

For detailed examples of how Kestra can be utilized in various business environments, you can explore Kestra's use cases.

Embrace automation, where the only limit is your imagination! 😛

· 10 min read
Anton Burnashev

tl;dr: In this blog post, we'll build a RAG chatbot for Zendesk Support data using Verba and dlt.

As businesses scale and the volume of internal knowledge grows, it becomes increasingly difficult for everyone in the company to find the right information at the right time.

With the latest advancements in large language models (LLMs) and vector databases, it's now possible to build a new class of tools that can help get insights from this data. One approach to do so is Retrieval-Augmented Generation (RAG). The idea behind RAGs is to retrieve relevant information from your database and use LLMs to generate a customised response to a question. Leveraging RAG enables the LLM to tailor its responses based on your proprietary data.

Diagram illustrating the process of internal business knowledge retrieval and augmented generation (RAG), involving components like Salesforce, Zendesk, Asana, Jira, Notion, Slack and HubSpot, to answer user queries and generate responses.

One such source of internal knowledge is help desk software. It contains a wealth of information about the company's customers and their interactions with the support team.

In this blog post, we'll guide you through the process of building a RAG application for Zendesk Support data, a popular help desk software. We’re going to use dlt, Weaviate, Verba and OpenAI.

dlt is an open-source Python library that simplifies the process of loading data from various sources. It does not requires extensive setup or maintenance and particularly useful for CRM data: highly tailored to the needs of the business and changes frequently.

Weaviate is an open-source, AI-native vector database that is redefining the foundation of AI-powered applications. With capabilities for vector, hybrid, and generative search over billions of data objects, Weaviate serves as the critical infrastructure for organizations building sophisticated AI solutions and exceptional user experiences.

Verba is an open-source chatbot powered by Weaviate. It's built on top of Weaviate's state-of-the-art Generative Search technology. Verba includes a web interface and a query engine that uses Weaviate database.

Prerequisites

  1. A URL and an API key of a Weaviate instance. We're using the hosted version of Weaviate to store our data. Head over to the Weaviate Cloud Services and create a new cluster. You can create a free sandbox, but keep in mind your cluster will expire and your data will be deleted after 14 days. In the "Details" of your cluster you'll find the Cluster URL and the API key.
  2. An OpenAI account and API key. Verba utilizes OpenAI's models to generate answers to user's questions and Weaviate uses them to vectorize text before storing it in the database. You can sign up for an account on OpenAI's website.
  3. A Zendesk account and API credentials.

Let’s get started

Step 1. Set up Verba

Create a new folder for your project and install Verba:

mkdir verba-dlt-zendesk
cd verba-dlt-zendesk
python -m venv venv
source venv/bin/activate
pip install goldenverba

To configure Verba, we need to set the following environment variables:

VERBA_URL=https://your-cluster.weaviate.network # your Weaviate instance URL
VERBA_API_KEY=F8...i4WK # the API key of your Weaviate instance
OPENAI_API_KEY=sk-...R # your OpenAI API key

You can put them in a .env file in the root of your project or export them in your shell.

Let's test that Verba is installed correctly:

verba start

You should see the following output:

INFO:     Uvicorn running on <http://0.0.0.0:8000> (Press CTRL+C to quit)
ℹ Setting up client
✔ Client connected to Weaviate Cluster
INFO: Started server process [50252]
INFO: Waiting for application startup.
INFO: Application startup complete.

Now, open your browser and navigate to http://localhost:8000.

A user interface screenshot showing Verba, retrieval and augmented generation chatbot, powered by Weaviate

Great! Verba is up and running.

If you try to ask a question now, you'll get an error in return. That's because we haven't imported any data yet. We'll do that in the next steps.

Step 2. Install dlt with Zendesk source

We get our data from Zendesk using dlt. Let's install it along with the Weaviate extra:

pip install "dlt[weaviate]"

This also installs a handy CLI tool called dlt. It will help us initialize the Zendesk verified data source—a connector to Zendesk Support API.

Let's initialize the verified source:

dlt init zendesk weaviate

dlt init pulls the latest version of the connector from the verified source repository and creates a credentials file for it. The credentials file is called secrets.toml and it's located in the .dlt directory.

To make things easier, we'll use the email address and password authentication method for Zendesk API. Let's add our credentials to secrets.toml:

[sources.zendesk.credentials]
password = "your-password"
subdomain = "your-subdomain"
email = "your-email@example.com"

We also need to specify the URL and the API key of our Weaviate instance. Copy the credentials for the Weaviate instance you created earlier and add them to secrets.toml:

[destination.weaviate.credentials]
url = "https://your-cluster.weaviate.network"
api_key = "F8.....i4WK"

[destination.weaviate.credentials.additional_headers]
X-OpenAI-Api-Key = "sk-....."

All the components are now in place and configured. Let's set up a pipeline to import data from Zendesk.

Step 3. Set up a dlt pipeline

Open your favorite text editor and create a file called zendesk_verba.py. Add the following code to it:

import itertools

import dlt
from weaviate.util import generate_uuid5
from dlt.destinations.adapters import weaviate_adapter

from zendesk import zendesk_support

def to_verba_document(ticket):
# The document id is the ticket id.
# dlt will use this to generate a UUID for the document in Weaviate.
return {
"doc_id": ticket["id"],
"doc_name": ticket["subject"],
"doc_type": "Zendesk ticket",
"doc_link": ticket["url"],
"text": ticket["description"],
}

def to_verba_chunk(ticket):
# We link the chunk to the document by using the document (ticket) id.
return {
"chunk_id": 0,
"doc_id": ticket["id"],
"doc_name": ticket["subject"],
"doc_type": "Zendesk ticket",
"doc_uuid": generate_uuid5(ticket["id"], "Document"),
"text": ticket["description"],
}

def main():
pipeline = dlt.pipeline(
pipeline_name="zendesk_verba",
destination="weaviate",
)

# Zendesk Support has data tickets, users, groups, etc.
zendesk_source = zendesk_support(load_all=False)

# Here we get a dlt resource containing only the tickets
tickets = zendesk_source.tickets

# Split the tickets into two streams
tickets1, tickets2 = itertools.tee(tickets, 2)

@dlt.resource(primary_key="doc_id", write_disposition="merge")
def document():
# Map over the tickets and convert them to Verba documents
# primary_key is the field that will be used to generate
# a UUID for the document in Weaviate.
yield from weaviate_adapter(
map(to_verba_document, tickets1),
vectorize="text",
)

@dlt.resource(primary_key="doc_id", write_disposition="merge")
def chunk():
yield from weaviate_adapter(
map(to_verba_chunk, tickets2),
vectorize="text",
)

info = pipeline.run([document, chunk])

return info

if __name__ == "__main__":
load_info = main()
print(load_info)

There's a lot going on here, so let's break it down.

First, in main() we create a dlt pipeline and add a Weaviate destination to it. We'll use it to store our data.

Next, we create a Zendesk Support source. It will fetch data from Zendesk Support API.

To match the data model of Zendesk Support to the internal data model of Verba, we need to convert Zendesk tickets to Verba documents and chunks. We do that by defining two functions: to_verba_document and to_verba_chunk. We also create two streams of tickets. We'll use them to create two dlt resources: document and chunk. These will populate the Document and Chunk classes in Verba. In both resources we instruct dlt which fields to vectorize using the weaviate_adapter() function.

We specify primary_key and write_disposition for both resources. primary_key is the field that will be used to generate a UUID for the document in Weaviate. write_disposition tells dlt how to handle duplicate documents. In our case, we want to merge them: if a document already exists in Weaviate, we want to update it with the new data.

Finally, we run the pipeline and print the load info.

Step 4. Load data into Verba

Let's run the pipeline:

python zendesk_verba.py

You should see the following output:

Pipeline zendesk_verba completed in 8.27 seconds
1 load package(s) were loaded to destination weaviate and into dataset None
The weaviate destination used <https://your-cluster.weaviate.network> location to store data
Load package 1695726495.383148 is LOADED and contains no failed jobs

Verba is now populated with data from Zendesk Support. However there are a couple of classes that need to be created in Verba: Cache and Suggestion. We can do that using the Verba CLI init command. When it runs it will ask us if we want to create Verba classes. Make sure to answer "n" to the question about the Document class — we don't want to overwrite it.

Run the following command:

verba init

You should see the following output:

===================== Creating Document and Chunk class =====================
ℹ Setting up client
✔ Client connected to Weaviate Cluster
Document class already exists, do you want to overwrite it? (y/n): n
⚠ Skipped deleting Document and Chunk schema, nothing changed
ℹ Done

============================ Creating Cache class ============================
ℹ Setting up client
✔ Client connected to Weaviate Cluster
'Cache' schema created
ℹ Done

========================= Creating Suggestion class =========================
ℹ Setting up client
✔ Client connected to Weaviate Cluster
'Suggestion' schema created
ℹ Done

We're almost there! Let's start Verba:

verba start

Step 4. Ask Verba a question

Head back to http://localhost:8000 and ask Verba a question. For example, "What are common issues our users report?".

A user interface screenshot of Verba showing Zendesk tickets with different issues like API problems and update failures, with responses powered by Weaviate

As you can see, Verba is able to retrieve relevant information from Zendesk Support and generate an answer to our question. It also displays the list of relevant documents for the question. You can click on them to see the full text.

Conclusion

In this blog post, we've built a RAG application for Zendesk Support using Verba and dlt. We've learned:

  • How easy it is to get started with Verba.
  • How to build dlt pipeline with a ready-to-use data source.
  • How to customize the pipeline so it matches the data model of Verba.

Where to go next?

  • Ensure your data is up-to-date. With dlt deploy you can deploy your pipeline to Google's Cloud Composer or GitHub Actions and run it on a schedule.
  • Build a Verba RAG for other data sources. Interested in building a RAG that queries other internal business knowledge than Zendesk? With dlt you can easily switch your data source. Other dlt verified sources of internal business knowledge include Asana, Hubspot, Jira, Notion, Slack and Salesforce. However, dlt isn’t just about ready-to-use data sources; many of our users choose to implement their own custom data sources.
  • Learn more about how Weaviate works. Check out Zero to MVP course to learn more about Weaviate database and how to use it to build your own applications.
  • Request more features. A careful reader might have noticed that we used both Document and Chunk classes in Verba for the same type of data. For simplicity's sake, we assumed that the ticket data is small enough to fit into a single chunk. However, if you if you're dealing with larger documents, you might consider splitting them into chunks. Should we add chunking support to dlt? Or perhaps you have other feature suggestions? If so, please consider opening a feature request in the dlt repo to discuss your ideas!

Let's stay in touch

If you have any questions or feedback, please reach out to us on the dltHub Slack.

This demo works on codespaces. Codespaces is a development environment available for free to anyone with a Github account. You'll be asked to fork the demo repository and from there the README guides you with further steps.
The demo uses the Continue VSCode extension.

Off to codespaces!

DHelp

Ask a question

Welcome to "Codex Central", your next-gen help center, driven by OpenAI's GPT-4 model. It's more than just a forum or a FAQ hub – it's a dynamic knowledge base where coders can find AI-assisted solutions to their pressing problems. With GPT-4's powerful comprehension and predictive abilities, Codex Central provides instantaneous issue resolution, insightful debugging, and personalized guidance. Get your code running smoothly with the unparalleled support at Codex Central - coding help reimagined with AI prowess.