
5 posts tagged with "ETL"

View All Tags

· 9 min read
Aman Gupta
info

TL;DR: This article compares deploying dbt-core standalone and using dlt-dbt runner on Google Cloud Functions. The comparison covers various aspects, along with a step-by-step deployment guide.

dbt or “data build tool” has become a standard for transforming data in analytical environments. Most data pipelines nowadays start with ingestion and finish with running a dbt package.

dlt or “data load tool” is an open-source Python library for easily creating data ingestion pipelines. And of course, after ingesting the data, we want to transform it into an analytical model. For this reason, dlt offers a dbt runner that’s able to just run a dbt model on top of where dlt loaded the data, without setting up any additional things like dbt credentials.

Using dbt in Google Cloud functions

To use dbt in cloud functions, we employed two methods:

  1. dbt-core on GCP cloud functions.
  2. dlt-dbt runner on GCP cloud functions.

Let’s discuss these methods one by one.

1. Deploying dbt-core on Google Cloud functions

Let's dive into running dbt-core up on cloud functions.

You should use this option for scenarios where you have already collected and housed your data in a data warehouse, and you need further transformations or modeling of the data. This is a good option if you have used dbt before and want to leverage the power of dbt-core. If you are new to dbt, please refer to dbt documentation: Link Here.

Let’s start with setting up the following directory structure:

dbt_setup
|-- main.py
|-- requirements.txt
|-- profiles.yml
|-- dbt_project.yml
|-- dbt_transform
|-- models
| |-- model1.sql
| |-- model2.sql
| |-- sources.yml
|-- (other dbt related contents, if required)

You can setup the contents in dbt_transform folder by initing a new dbt project, for details refer to documentation.

note

We recommend setting up and testing dbt-core locally before using it in cloud functions.

To run dbt-core on GCP cloud functions:

  1. Once you've tested the dbt-core package locally, update the profiles.yml before migrating the folder to the cloud function as follows:

    dbt_gcp: # project name
    target: dev # environment
    outputs:
    dev:
    type: bigquery
    method: oauth
    project: please_set_me_up! # your GCP project name
    dataset: please_set_me_up! # your project dataset name
    threads: 4
    impersonate_service_account: please_set_me_up! # GCP service account

    This service account should have bigquery read and write permissions.

  2. Next, modify the main.py as follows:

    import os
    import subprocess
    import logging

    # Configure logging
    logging.basicConfig(level=logging.INFO)

    def run_dbt(request):
    try:
    # Set your dbt profiles directory (assuming it's in /workspace)
    os.environ['DBT_PROFILES_DIR'] = '/workspace/dbt_transform'

    # Log the current working directory and list files
    dbt_project_dir = '/workspace/dbt_transform'
    os.chdir(dbt_project_dir)

    # Log the current working directory and list files
    logging.info(f"Current working directory: {os.getcwd()}")
    logging.info(f"Files in the current directory: {os.listdir('.')}")

    # Run dbt command (e.g., dbt run)

    result = subprocess.run(
    ['dbt', 'run'],
    capture_output=True,
    text=True
    )

    # Return dbt output
    return result.stdout

    except Exception as e:
    logging.error(f"Error running dbt: {str(e)}")
    return f"Error running dbt: {str(e)}"
  3. Next, list runtime-installable modules in requirements.txt:

    dbt-core
    dbt-bigquery
  4. Finally, you can deploy the function using gcloud CLI as:

    gcloud functions deploy YOUR_FUNCTION_NAME \
    --gen2 \
    --region=YOUR_REGION \
    --runtime=python310 \
    --source=YOUR_SOURCE_LOCATION \
    --entry-point=YOUR_CODE_ENTRYPOINT \
    TRIGGER_FLAGS

    You have option to deploy the function via GCP Cloud Functions' GUI.

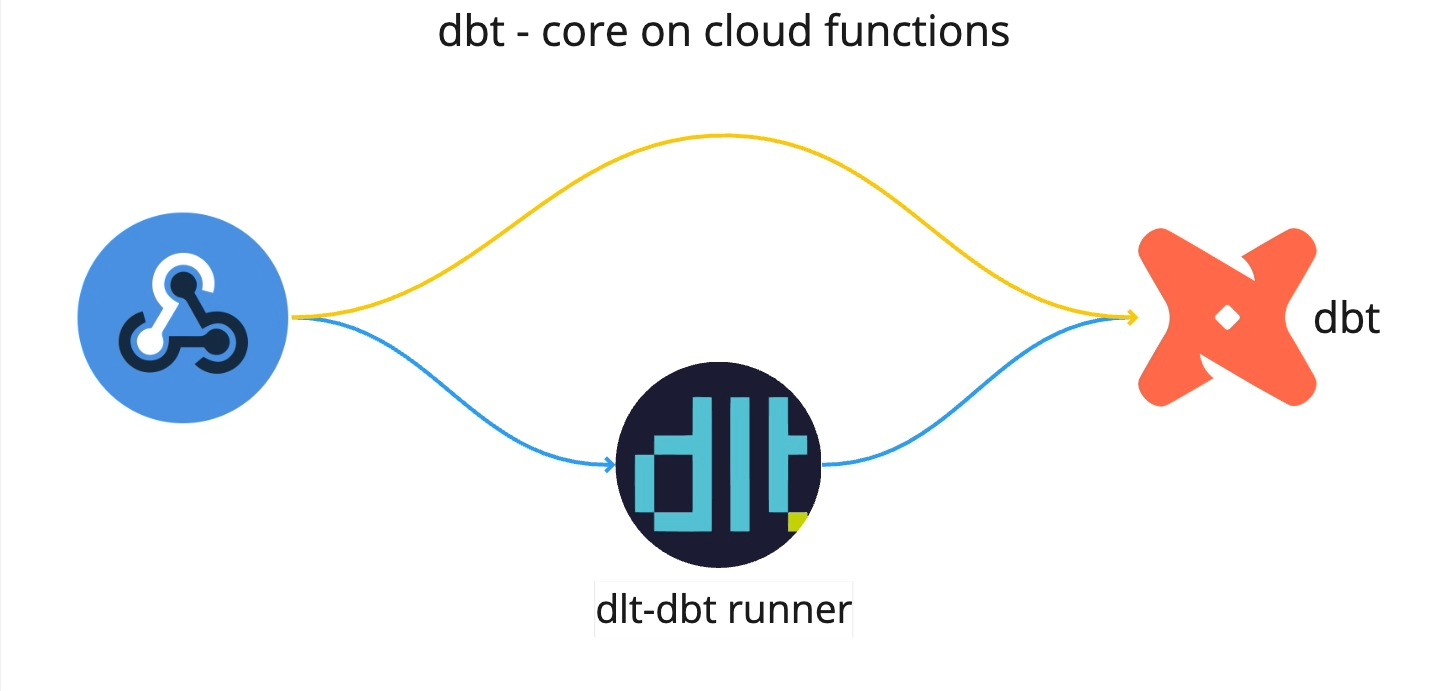
2. Deploying function using dlt-dbt runner

The second option is running dbt using data load tool(dlt).

I work at dlthub and often create dlt pipelines. These often need dbt for modeling the data, making the dlt-dbt combination highly effective. For using this combination on cloud functions, we used dlt-dbt runner developed at dlthub.

The main reason I use this runner is because I load data with dlt and can re-use dlt’s connection to the warehouse to run my dbt package, saving me the time and code complexity I’d need to set up and run dbt standalone.

To integrate dlt and dbt in cloud functions, use the dlt-dbt runner; here’s how:

  1. Lets start by creating the following directory structure:

    dbt_setup
    |-- main.py
    |-- requirements.txt
    |-- dbt_project.yml
    |-- dbt_transform
    |-- models
    | |-- model1.sql
    | |-- model2.sql
    | |-- sources.yml
    |-- (other dbt related contents, if required)

    You can set up the dbt by initing a new project, for details refer to documentation.

    note

    With the dlt-dbt runner configuration, setting up a profiles.yml is unnecessary. DLT seamlessly shares credentials with dbt, and on Google Cloud Functions, it automatically retrieves service account credentials, if none are provided.

  2. Next, configure the dbt_projects.yml and set the model directory, for example:

    model-paths: ["dbt_transform/models"]
  3. Next, configure the main.py as follows:

    import dlt
    import logging, json
    from flask import jsonify
    from dlt.common.runtime.slack import send_slack_message

    def run_pipeline(request):
    """
    Set up and execute a data processing pipeline, returning its status
    and model information.

    This function initializes a dlt pipeline with pre-defined settings,
    runs the pipeline with a sample dataset, and then applies dbt
    transformations. It compiles and returns the information about
    each dbt model's execution.

    Args:
    request: The Flask request object. Not used in this function.

    Returns:
    Flask Response: A JSON response with the pipeline's status
    and dbt model information.
    """
    try:
    # Sample data to be processed
    data = [{"name": "Alice Smith", "id": 1, "country": "Germany"},
    {"name": "Carlos Ruiz", "id": 2, "country": "Romania"},
    {"name": "Sunita Gupta", "id": 3, "country": "India"}]

    # Initialize a dlt pipeline with specified settings
    pipeline = dlt.pipeline(
    pipeline_name="user_data_pipeline",
    destination="bigquery",
    dataset_name="dlt_dbt_test"
    )

    # Run the pipeline with the sample data
    pipeline.run(data, table_name="sample_data")

    # Apply dbt transformations and collect model information
    models = transform_data(pipeline)
    model_info = [
    {
    "model_name": m.model_name,
    "time": m.time,
    "status": m.status,
    "message": m.message
    }
    for m in models
    ]

    # Convert the model information to a string
    model_info_str = json.dumps(model_info)

    # Send the model information to Slack
    send_slack_message(
    pipeline.runtime_config.slack_incoming_hook,
    model_info_str
    )

    # Return a success response with model information
    return jsonify({"status": "success", "model_info": model_info})
    except Exception as e:
    # Log and return an error response in case of any exceptions
    logging.error(f"Error in running pipeline: {e}", exc_info=True)

    return jsonify({"status": "error", "error": str(e)}), 500

    def transform_data(pipeline):
    """
    Execute dbt models for data transformation within a dlt pipeline.

    This function packages and runs all dbt models associated with the
    pipeline, applying defined transformations to the data.

    Args:
    pipeline (dlt.Pipeline): The pipeline object for which dbt
    transformations are run.

    Returns:
    list: A list of dbt model run information, indicating the
    outcome of each model.

    Raises:
    Exception: If there is an error in running the dbt models.
    """
    try:
    # Initialize dbt with the given pipeline and virtual environment
    dbt = dlt.dbt.package(
    pipeline,
    "/workspace/dbt_transform",
    venv=dlt.dbt.get_venv(pipeline)
    )
    logging.info("Running dbt models...")
    # Run all dbt models and return their run information
    return dbt.run_all()
    except Exception as e:
    # Log and re-raise any errors encountered during dbt model
    # execution
    logging.error(f"Error in running dbt models: {e}", exc_info=True)
    raise

    # Main execution block
    if __name__ == "__main__":
    # Execute the pipeline function.
    run_pipeline(None)
  4. The send_slack_message function is utilized for sending messages to Slack, triggered by both success and error events. For setup instructions, please refer to the official documentation here.

    RUNTIME__SLACK_INCOMING_HOOK was set up as environment variable in the above code.

  5. Next, list runtime-installable modules in requirements.txt:

    dbt-core
    dbt-bigquery
  6. Finally, you can deploy the function using gcloud CLI as:

    gcloud functions deploy YOUR_FUNCTION_NAME \
    --gen2 \
    --region=YOUR_REGION \
    --runtime=python310 \
    --source=YOUR_SOURCE_LOCATION \
    --entry-point=YOUR_CODE_ENTRYPOINT \
    TRIGGER_FLAGS

The merit of this method is that it can be used to load and transform data simultaneously. Using dlt for data loading and dbt for modeling makes using dlt-dbt a killer combination for data engineers and scientists, and my preferred choice. This method is especially effective for batched data and event-driven pipelines with small to medium workloads. For larger data loads nearing timeout limits, consider separating dlt and dbt into different cloud functions.

For more info on using dlt-dbt runner , please refer to the official documentation by clicking here.

Deployment considerations: How does cloud functions compare to Git Actions?

At dlthub we already natively support deploying to GitHub Actions, enabling you to have a serverless setup with a 1-command deployment.

GitHub actions is an orchestrator that most would not find suitable for a data warehouse setup - but it certainly could do the job for a minimalistic setup. GitHub actions provide 2000 free minutes per month, so if our pipelines run for 66 minutes per day, we fit in the free tier. If our pipelines took another 1h per day, we would need to pay ~15 USD/month for the smallest machine (2 vCPUs) but you can see how that would be expensive if we wanted to run it continuously or had multiple pipelines always-on in parallel.

Cloud functions are serverless lightweight computing solutions that can handle small computational workloads and are cost-effective. dbt doesn't require the high computing power of the machine because it uses the computing power of the data warehouse to perform the transformations. This makes running dbt-core on cloud functions a good choice. The free tier would suffice for about 1.5h per day of running a 1 vCPU and 2 GB RAM machine, and if we wanted an additional 1h per day for this hardware it would cost us around 3-5 USD/month.

DLT-DBT-RUNNER_IMAGE

When deploying dbt-core on cloud functions, there are certain constraints to keep in mind. For instance, there is a 9-minute time-out limit for all 1st Gen functions. For 2nd Gen functions, there is a 9-minute limit for event-driven functions and a 60-minute limit for HTTP functions. Since dbt works on the processing power of the data warehouse it's operating on, 60 minutes is sufficient for most cases with small to medium workloads. However, it is important to remember the 9-minute cap when using event-driven functions.

Conclusion

When creating lightweight pipelines, using the two tools together on one cloud function makes a lot of sense, simplifying the setup process and the handover between loading and transformation.

However, for more resource-intensive pipelines, we might want to improve resource utilisation by separating the dlt loading from the dbt running because while dbt’s run speed is determined by the database, dlt can utilize the cloud function’s hardware resources.

When it comes to setting up just a dbt package to run on cloud functions, I guess it comes to personal preference: I prefer dlt as it simplifies credential management. It automatically shares credentials with dbt, making setup easier. Streamlining the process further, dlt on Google Cloud functions, efficiently retrieves service account credentials, when none are provided. I also used dlt’s Slack error reporting function that sends success and error notifications from your runs directly to your Slack channel, helping me manage and monitor my runs.

· 5 min read
Rahul Joshi
info

TL;DR: While most companies continue to build their businesses on top of SAP, when it comes to analytics, they prefer to take advantage of the price and elastic compute of modern cloud infrastructure. As a consequence, we get several dlt users asking for a simple and low-cost way to migrate from SAP to cloud data warehouses like Snowflake. In this blog, I show how you can build a custom SAP connector with dlt and use it to load SAP HANA tables into Snowflake.

Blog image

In case you haven’t figured it out already, we at dltHub love creating blogs and demos. It’s fun, creative, and gives us a chance to play around with many new tools. We are able to do this mostly because, like any other modern tooling, dlt just fits in the modern ecosystem. Not only does dlt have existing integrations (to, for example, GCP, AWS, dbt, airflow etc.) that can simply be “plugged in”, but it is also very simple to customize it to integrate with almost any other modern tool (such as Metabase, Holistics, Dagster, Prefect etc.).

But what about enterprise systems like SAP? They are, after all, the most ubiquitous tooling out there: according to SAP data, 99 out of 100 largest companies are SAP customers. A huge part of the reason for this is that their ERP system is still the gold standard in terms of effectivity and reliability. However, when it comes to OLAP workloads like analytics, machine learning, predictive modelling etc., many companies prefer the convenience and cost savings of modern cloud solutions like GCP, AWS, Azure, etc..

So, wouldn’t it be nice to be able to integrate SAP into the modern ecosystem?

Unfortunately, this is not that simple. SAP does not integrate easily with non-SAP systems, and migrating data out from SAP is complicated and/or costly. This often means that ERP data stays separate from analytics data.

Creating a dlt integration

Our users have been asking for SAP HANA data, hence I decided to create a custom dlt integration to SAP’s in-memory data warehouse: SAP HANA. Given its SQL backend and Python API, I figured dlt should also have no problem connecting to it.

I then use this pipeline to load SAP HANA tables into Snowflake, since Snowflake is cloud agnostic and can be run in different environments (such AWS, GCP, Azure, or any combination of the three). This is how I did it:

Step 1: I created an instance in SAP HANA cloud.

(I used this helpful tutorial to navigate SAP HANA.)

SAP instance

Step 2: I inserted some sample data.
SAP insert data

Step 3: With tables created in SAP HANA, I was now ready to create a dlt pipeline to extract it into Snowflake:

Since SAP HANA has a SQL backend, I decided to extract the data using dlt’s SQL source

  1. I first created a dlt pipeline

    dlt init sql_database snowflake

  2. I then passed the connection string for my HANA instance inside the loading function in sql_database_pipeline.py. (Optional: I also specified the tables that I wanted to load in sql_database().with_resources("v_city", "v_hotel", "room") )

  3. Before running the pipeline I installed all necessary requirements using

    pip install -r requirements.txt

    The dependencies inside requirements.txt are for the general SQL source. To extract data specifically from HANA, I also installed the packages hdbcli and sqlalchemy-hana.

Step 4: I finally ran the pipeline using python sql_database_pipeline.py. This loaded the tables into Snowflake.

Data in Snowflake

Takeaway

The dlt SAP HANA connector constructed in this demo works like any other dlt connector, and is able to successfully load data from SAP HANA into data warehouses like Snowflake.

Furthermore, the demo only used a toy example, but the SQL source is a production-ready source with incremental loading, merges, data contracts etc., which means that this pipeline could also be configured for production use-cases.

Finally, the dlt-SAP integration has bigger consequences: it allows you to add other tools like dbt, airflow etc. easily into an SAP workflow, since all of these tools integrate well with dlt.

Next steps

This was a just first step into exploring what’s possible. Creating a custom dlt connector worked pretty well for SAP HANA, and there are several possible next steps, such as converting this to a verified source, or building other SAP connectors.

  1. Creating a verified source for SAP HANA: This should be pretty straight-forward since it would require a small modification of the existing SQL source.
  2. Creating a dlt connector for SAP S/4 HANA: S/4 HANA is SAP’s ERP software that runs on the HANA database. The use case would be to load ERP tables from S/4 HANA into other data warehouses like Snowflake. Depending on the requirements, there are two ways to go about it:
    1. Low volume data: This would again be straight-forward. SAP offers REST API end points to access ERP tables, and dlt is designed to be able to load data from any such end point.
    2. High volume data: dlt can also be configured for the use case of migrating large volumes of data with fast incremental or merge syncs. But this would require some additional steps, such as configuring the pipeline to access HANA backend directly from Python hdbcli.

· 8 min read
Aman Gupta

💡 This article explores methods for monitoring transactional events, allowing immediate action and data capture that might be lost otherwise. We focus on Github, Slack, and Hubspot, demonstrating techniques applicable to low-volume transactional events (under 500k/month) within the free tier. For clickstream tracking or higher volumes, we recommend more scalable solutions.

There’s more than one way to sync data. Pulling data after it has been collected from APIs is a classic way, but some types of data are better transmitted as an event at the time of happening. Our approach is event-triggered and can include actions like:

ApplicationAction
SlackSending messages in Slack
GithubCommit, comment, or PR actions
HubspotObject creation or meeting specific criteria

These actions initiate a webhook that sends a POST request to trigger a DLT pipeline for event ingestion. The data is then loaded into BigQuery.

pictorial_demonstration

This setup enables real-time alerts or event storage for later use. For example, let’s say you want to alert every time something happens - you’d want to be able to capture an event being sent to you and act on it. Or, in some cases, you store it for later use. This guide covers a use case for deploying and setting up webhooks.

Why do we use webhooks?

Whenever we want to receive an event from an external source, we need a “recipient address” to which they can send the data. To solve this problem, an effortless way is to use a URL as the address and accept a payload as data.

Why cloud functions?

The key reasons for using cloud functions include:

  1. To have a URL up and accept the data payload, we would need some service or API always to be up and ready to listen for the data.

  2. Creating our application for this would be cumbersome and expensive. It makes sense to use some serverless service for low volumes of events.

  3. On AWS, you would use API gateway + lambda to handle incoming events, but for GCP users, the option is more straightforward: Google Cloud functions come with an HTTP trigger, which enables you to create a URL and accept a payload.

  4. The pricing for cloud functions is unbeatable for low volumes: For ingesting an event with a minor function, assuming processing time to be a few seconds, we could invoke a few hundred thousand calls every month for free. For more pricing details, see the GCP pricing page for cloud functions.

Let's dive into the deployment of webhooks and app setup, focusing next on triggers from GitHub, Slack, and HubSpot for use cases discussed above.

1. GitHub Webhook

This GitHub webhook is triggered upon specified events such as pull requests (PRs), commits, or comments. It relays relevant data to BigQuery. Set up the GitHub webhook by creating the cloud function URL and configuring it in the GitHub repository settings.

1.1 Initialize GitHub webhook deployment

To set up the webhook, start by creating a cloud function. Follow these brief steps, and for an in-depth guide, please refer to the detailed documentation.

  1. Log into GCP and activate the Cloud Functions API.

  2. Click 'Create Function' in Cloud Functions, and select your region and environment setup.

  3. Choose HTTP as the trigger, enable 'Allow unauthenticated invocations', save, and click 'Next'.

  4. Set the environment to Python 3.10 and prepare to insert code into main.py:

    import dlt
    import json
    import time
    from google.cloud import bigquery

    def github_webhook(request):
    # Extract relevant data from the request payload
    data = request.get_json()

    Event = [data]

    pipeline = dlt.pipeline(
    pipeline_name='platform_to_bigquery',
    destination='bigquery',
    dataset_name='github_data',
    )

    pipeline.run(Event, table_name='webhook') #table_name can be customized
    return 'Event received and processed successfully.'
  5. Name the function entry point "github_webhook" and list required modules in requirements.txt.

    # requirements.txt
    dlt[bigquery]
  6. Post-deployment, a webhook URL is generated, typically following a specific format.

    https://{region]-{project-id}.cloudfunctions.net/{cloud-function-name}

Once the cloud function is configured, it provides a URL for GitHub webhooks to send POST requests, funneling data directly into BigQuery.

1.2 Configure the repository webhook in GitHub

Set up a GitHub repository webhook to trigger the cloud function on specified events by following these steps:

  1. Log into GitHub and go to your repository.
  2. Click "Settings" > "Webhooks" > "Add webhook."
  3. Enter the cloud function URL in "Payload URL."
  4. Choose "Content-Type" and select events to trigger the webhook, or select "Just send me everything."
  5. Click "Add webhook."

With these steps complete, any chosen events in the repository will push data to BigQuery, ready for analysis.

2. Slack Webhook

This Slack webhook fires when a user sends a message in a channel where the Slack app is installed. To set it up, set up a cloud function as below and obtain the URL, then configure the message events in Slack App settings.

2.1 Initialize Slack webhook deployment

Set up the webhook by creating a cloud function, using the same steps as for the GitHub webhook.

  1. Here’s what main.py looks like:

    import dlt
    from flask import jsonify

    def slack_webhook(request):
    # Handles webhook POST requests
    if request.method == 'POST':
    data = request.get_json()

    # Responds to Slack's verification challenge
    if 'challenge' in data:
    return jsonify({'challenge': data['challenge']})

    # Processes a message event
    if 'event' in data and 'channel' in data['event']:
    message_data = process_webhook_event(data['event'])

    # Configures and initiates a DLT pipeline
    pipeline = dlt.pipeline(
    pipeline_name='platform_to_bigquery',
    destination='bigquery',
    dataset_name='slack_data',
    )

    # Runs the pipeline with the processed event data
    pipeline.run([message_data], table_name='webhook')
    return 'Event processed.'
    else:
    return 'Event type not supported', 400
    else:
    return 'Only POST requests are accepted', 405

    def process_webhook_event(event_data):
    # Formats the event data for the DLT pipeline
    message_data = {
    'channel': event_data.get('channel'),
    'user': event_data.get('user'),
    'text': event_data.get('text'),
    'ts': event_data.get('ts'),
    # Potentially add more fields according to event_data structure
    }
    return message_data
  2. Name the entry point "slack_webhook" and include the necessary modules in requirements.txt, the same as the GitHub webhook setup.

  3. Once the cloud function is configured, you get a URL for Slack events to send POST requests, funneling data directly into BigQuery.

2.2 Set up and configure a Slack app

Create and install a Slack app in your workspace to link channel messages from Slack to BigQuery as follows:

  1. Go to "Manage apps" in workspace settings; click "Build" and "Create New App".
  2. Choose "from scratch", name the app, select the workspace, and create the app.
  3. Under "Features", select "Event Subscription", enable it, and input the Cloud Function URL.
  4. Add message.channels under "Subscribe to bot events".
  5. Save and integrate the app to the desired channel.

With these steps complete, any message sent on the channel will push data to BigQuery, ready for analysis.

3. Hubspot webhook

A Hubspot webhook can be configured within an automation workflow, applicable to contacts, companies, deals, tickets, quotes, conversations, feedback submissions, goals and invoices. It triggers upon specific conditions or data filters. To establish it, create a cloud function, retrieve its URL, and input this in Hubspot's automation workflow settings for message events.

3.1 Initialize Hubspot webhook deployment

Set up the webhook by creating a cloud function, using the same steps as for the GitHub webhook.

  1. Here’s what main.pylooks like:

    import dlt
    from flask import jsonify

    def hubspot_webhook(request):
    # Endpoint for handling webhook POST requests from Hubspot
    if request.method == 'POST':
    # Get JSON data from the POST request
    data = request.get_json()

    # Initialize and configure the DLT pipeline
    pipeline = dlt.pipeline(
    pipeline_name=ßigquery', # Destination service for the data
    dataset_name='hubspot_webhooks_dataset', # BigQuery dataset name
    )

    # Execute the pipeline with the incoming data
    pipeline.run([data], table_name='hubspot_contact_events')

    # Return a success response
    return jsonify(message='HubSpot event processed.'), 200
    else:
    # Return an error response for non-POST requests
    return jsonify(error='Only POST requests are accepted'), 405

  2. Name the entry point "your_webhook" and include the necessary modules in requirements.txt, the same as the GitHub webhook setup.

  3. Once the cloud function is configured, you get a URL for Slack events to send POST requests, funneling data directly into BigQuery.

3.2 Configure a Hubspot automation workflow

To activate a Hubspot workflow with your webhook:

  1. Go to Hubspot: "Automation" > "Workflows" > "Create workflow".
  2. Start from scratch; choose "Company-based" for this example.
  3. Set "Object created" as the trigger.
  4. Add the "Send a webhook" action, use the "POST" method, and input your webhook URL.
  5. Select the company properties to include, test, and save.

This triggers the webhook upon new company creation, sending data to Bigquery via DLT.

In conclusion

Setting up a webhook is straightforward.

Using dlt with schema evolution, we can accept the events without worrying about their schema. However, for events with custom schemas or vulnerable to bad data quality or abuse, consider using dlt’s data contracts.

· 9 min read
Adrian Brudaru

In a recent article, Anna Geller, product manager at Kestra, highlighted why data ingestion will never be solved. In her article, she described the many obstacles around data ingestion, and detailed how various companies and open-source tools approached this problem.

I’m Adrian, data builder. Before starting dlthub, I was building data warehouses and teams for startups and corporations. Since I was such a power-builder, I have been looking for many years into how this space could be solved.

The conviction on which we started dlt is that, to solve the data ingestion problem, we need to identify the motivated problem solver and turbo charge them with the right tooling.

The current state of data ingestion: dependent on vendors or engineers.

When building a data pipeline, we can start from scratch, or we can look for existing solutions.

How can we build an ingestion pipeline?

  • SaaS tools: We could use ready-made pipelines or use building blocks to configure a new API call.
  • SDKs: We could ask a software developer to build a Singer or Airbyte source. Or we could learn object-oriented programming and the SDKs and become the software developer - but the latter is an unreasonable pathway for most.
  • Custom pipelines: We could ask a data engineer to build custom pipelines. Unfortunately, everyone is building from scratch, so we usually end up reinventing the flat tire. Pipelines often break and have a high maintenance effort, bottlenecking the amount that can be built and maintained per data engineer.

Besides the persona-tool fit, in the current tooling, there is a major trade-off between complexity. For example, SaaS tools or SaaS SDKs offer “building blocks” and leave little room for customizations. On the other hand, custom pipelines enable one to do anything they could want but come with a high burden of code, complexity, and maintenance. And classic SDKs are simply too difficult for the majority of data people.

etl_by_others.png

So how can we solve ingestion?

Ask first, who should solve ingestion. Afterwards, we can look into the right tools.

The builder persona should be invested in solving the problem, not into preserving it.

UI first? We already established that people dependent on a UI with building blocks are non-builders - they use what exists. They are part of the demand, not part of the solution.

SDK first? Further, having a community of software engineers for which the only reason to maintain pipelines is financial incentives also doesn’t work. For example, Singer has a large community of agencies that will help - for a price. But the open-source sources are not maintained, PRs are not accepted, etc. It’s just another indirect vendor community for whom the problem is desired.

The reasonable approach is to offer something to a person who wants to use the data but also has some capability to do something about it, and willingness to make an effort. So the problem has to be solved in code, and it logically follows that if we want the data person to use this without friction, it has to be Python.

So the existing tools are a dead end: What do custom pipeline builders do?

Unfortunately, the industry has very little standardization, but we can note some patterns.

df.to_sql() was a great first step

For the Python-first users, pandas df.to_sql() automated loading dataframes to SQL without having to worry about database-specific commands or APIs.

Unfortunately, this way of loading is limited and not very robust. There is no support for merge/upsert loading or for advanced configuration like performance hints. The automatic typing might sometimes also lead to issues over time with incremental loading.

Additionally, putting the data into a dataframe means loading it into memory, leading to limitations. So a data engineer considering how to create a boilerplate loading solution would not end up relying on this method because it would offer too little while taking away fine-grain control.

So while this method works well for quick and dirty work, it doesn’t work so well in production. And for a data engineer, this method adds little while taking away a lot. The good news: we can all use it; The bad news: it’s not engineering-ready.

Inserting JSON directly is a common antipattern. However, many developers use it because it solves a real problem.

Inserting JSON “as is” is a common antipattern in data loading. We do it because it’s a quick fix for compatibility issues between untyped semi-structured data and strongly typed databases. This enables us to just feed raw data to the analyst who can sort through it and clean it and curate it, which in turn enables the data team to not get bottlenecked at the data engineer.

So, inserting JSON is not all bad. It solves some real problems, but it has some unpleasant side effects:

  • Without an explicit schema, you do not know if there are schema changes in the data.
  • Without an explicit schema, you don’t know if your JSON extract path is unique. Many applications output inconsistent types, for example, a dictionary for a single record or a list of dicts for multiple records, causing JSON path inconsistencies.
  • Without an explicit schema, data discovery and exploration are harder, requiring more effort.
  • Reading a JSON record in a database usually scans the entire record, multiplying cost or degrading performance significantly.
  • Without types, you might incorrectly guess and suffer from frequent maintenance or incorrect parsing.
  • Dashboarding tools usually cannot handle nested data - but they often have options to model tabular data.

Boilerplate code vs one-offs

Companies who have the capacity will generally create some kind of common, boilerplate methods that enable their team to re-use the same glue code. This has major advantages but also disadvantages: building something like this in-house is hard, and the result is often a major cause of frustration for the users. What we usually see implemented is a solution to a problem, but is usually immature to be a nice technology and far from being a good product that people can use.

One-offs have their advantage: they are easy to create and can generally take a shortened path to loading data. However, as soon as you have more of them, you will want to have a single point of maintenance as above.

The solution: A pipeline-building dev tool for the Python layman

Let’s let Drake recap for us:

what would drake do

So what does our desired solution look like?

  • Usable by any Python user in any Python environment, like df.to_sql()
  • Automate difficult things: Normalize JSON into relational tables automatically. Alert schema changes or contract violations. Add robustness, scaling.
  • Keep code low: Declarative hints are better than imperative spaghetti.
  • Enable fine-grained control: Builders should be enabled to control finer aspects such as performance, cost, compliance.
  • Community: Builders should be enabled to share content that they create

We formulated our product principles and went from there.

And how far did we get?

  • dlt is usable by any Python user and has a very shallow learning curve.
  • dlt runs where Python runs: Cloud functions, notebooks, etc.
  • Automate difficult things: Dlt’s schema automations and extraction helpers do 80% of the pipeline work.
  • Keep code low: by automating a large chunk and offering declarative configuration, dlt keeps code as short as it can be.
  • Fine-grained control: Engineers with advanced requirements can easily fulfill them by using building blocks or custom code.
  • Community: We have a sharing mechanism (add a source to dlt’s sources) but it’s too complex for the target audience. There is a trade-off between the quality of code and strictness of requirements which we will continue exploring. We are also considering how LLMs can be used to assist with code quality and pipeline generation in the future.

What about automating the builder further?

LLMs are changing the world. They are particularly well-suited at language tasks. Here, a library shines over any other tool - simple code like you would write with dlt can automatically be written by GPT.

The same cannot be said for SDK code or UI tools: because they use abstractions like classes or configurations, they deviate much further from natural language, significantly increasing the complexity of using LLMs to generate for them.

LLMs aside, technology is advancing faster than our ability to build better interfaces - and a UI builder has been for years an obsolete choice. With the advent of self-documenting APIs following OpenAPI standard, there is no more need for a human to use a UI to compose building blocks - the entire code can be generated even without LLM assistance (demo of how we do it). An LLM could then possibly improve it from there. And if the APIs do not follow the standard, the building blocks of a UI builder are even less useful, while an LLM could read the docs and brute-force solutions.

So, will data ingestion ever be a fully solved problem? Yes, by you and us together.

In summary, data ingestion is a complex challenge that has seen various attempts at solutions, from SDKs to custom pipelines. The landscape is marked by trade-offs, with existing tools often lacking the perfect balance between simplicity and flexibility.

dlt, as a pipeline-building dev tool designed for Python users, aims to bridge this gap by offering an approachable, yet powerful solution. It enables users to automate complex tasks, keep their code concise, and maintain fine-grained control over their data pipelines. The community aspect is also a crucial part of the dlt vision, allowing builders to share their content and insights.

The journey toward solving data ingestion challenges is not just possible; it's promising, and it's one that data professionals together with dlt are uniquely equipped to undertake.

Resources:

· 6 min read
Adrian Brudaru
info

PSSSST! You do ELT, right? not ETL? asking for a friend...

ETL vs ELT? A vendor driven story.

One of the earliest tooling for "ETL" data was Pentaho Kettle. Kettle stands for "Kettle Extraction Transformation Transport Load Environment" and signifies that it transforms the data before loading it. It was usually used to load data which was later transformed in SQL via "SQL scripts", while still in the tool, or via database triggers or views outside of the tool.

Indeed, the tool creators imagined some folks would write java to transform before loading, but the vast majority of data users just wanted to use SQL.

Sounds familiar? This is not so different to today's "ELT", is it?

Why did we call it ELT?

The people

Well, first of all SQL is much more accessible and very powerful for transforming tables, columns and rows - where programming handles single values. So before purpose built tooling existed, data people were already doing the transform in SQL - it just made sense.

The "EL" vendors

In the decade following Pentaho, Saas solutions started offering pipelines that load data into your database, removing the option for you to tinker with it before loading. For this reason, they would call it "ELT".

The db vendors

The concept also resonated with MPP DBs (massive parallel processing), such as Snowflake, Redshift, Bigquery, which were more than happy to encourage doing all the compute on their side.

The "T in ELT" vendors

Another puzzle piece was dbt, a tool purpose built for SQL transform. So if there's a question of ETL or ELT, dbt can only answer ELT. In dbt's word view, data starts dirty in your warehouse, where you "rename, cast, join, enrich" - a true ELT. To make the drudgery of data cleaning in SQL easier, dbt offers some python support to enable generating some of the typing and renaming SQL. They also offer a litte bit of python support for scalar operations in some db vendor systems.

What do we really do?

Most of us do a little bit of both - we extract with python, and the next steps are loading, cleaning and curation. In some cases, cleaning and curation are optional. For example, when we load a report from another platform we will probably not need to clean or curate anything.

Where do we clean data?

Data cleaning usually refers to normalising the data into correct types, usable names, etc. Doing this in SQL results in writing a lot of manual code that needs to be maintained. On the other hand, sturcturing data in python isn't easy either, it's just less technically difficult, but when metadata is missing, it becomes guesswork.

So, technically the easier place to clean data is in python, but likely the majority will do it in SQL as they are more practiced in SQL.

Where do we transform data?

When it comes to working with tables, SQL is still the better place to be. Joins and aggregations are the core operations that will happen here and they would be much harder to handle scalably in python.

dlt puts the small t back in EtlT, let's see how.

So, python is still superior at a few operations

  • Typing, renaming, normalising, unpacking
  • complex scalar operations

While we will leave the aggregations and joins to the big T, SQL.

Normalisation, typing, unpacking

dlt does this well out of the box. Automatic typing, renaming, flattening, and ddl deployment are all handled by the schema inference and evolution engine. This engine is configurable in both how it works and what it does, you can read more here: Normaliser, schema settings

Here is a usage example (it's built into the pipeline):


import dlt

# Json, dataframes, iterables, all good
# the data will be auto typed and normalised
data = [{'id': 1, 'name': 'John'}]

# open connection
pipe = dlt.pipeline(destination='bigquery',
dataset_name='raw_data')

# self-explanatory declarative interface
job_status = pipe.run(data,
write_disposition="merge",
primary_key="id",
table_name="users")

# optionally load schema and metadata
pipe.run([job_status],
write_disposition="append",
table_name="loading_status")

Scalar operations

Sometimes we need to edit a column's value in some very specific way for which SQL doesn't quite cut it. Sometimes, we have data we need to pseudonymise before loading for regulatory reasons.

Because dlt is a library, it means you can easily change how the data stream is produced or ingested. Besides your own customisations, dlt also supports injecting your transform code inside the event stream, see an example here

Here is a code example of pseudonymisation, a common case where data needs to be transformed before loading:

import dlt
import hashlib

@dlt.source
def dummy_source(prefix: str = None):
@dlt.resource
def dummy_data():
for _ in range(3):
yield {'id':_, 'name': f'Jane Washington {_}'}
return dummy_data(),

def pseudonymize_name(doc):
'''
Pseudonmyisation is a deterministic type of PII-obscuring
Its role is to allow identifying users by their hash,
without revealing the underlying info.
'''
# add a constant salt to generate
salt = 'WI@N57%zZrmk#88c'
salted_string = doc['name'] + salt
sh = hashlib.sha256()
sh.update(salted_string.encode())
hashed_string = sh.digest().hex()
doc['name'] = hashed_string
return doc


# 1. Create an instance of the source so you can edit it.
data_source = dummy_source()
# 2. Modify this source instance's resource
data_source = data_source.dummy_data().add_map(pseudonymize_name)
# 3. Inspect your result
for row in data_source:
print(row)
#{'id': 0, 'name': '96259edb2b28b48bebce8278c550e99fbdc4a3fac8189e6b90f183ecff01c442'}
#{'id': 1, 'name': '92d3972b625cbd21f28782fb5c89552ce1aa09281892a2ab32aee8feeb3544a1'}
#{'id': 2, 'name': '443679926a7cff506a3b5d5d094dc7734861352b9e0791af5d39db5a7356d11a'}

pipeline = dlt.pipeline(pipeline_name='example', destination='bigquery', dataset_name='normalized_data')
load_info = pipeline.run(data_source)

The big T

Finally, once you have clean data loaded, you will probably prefer to use SQL and one of the standard tools. dlt offers a dbt runner to get you started easily with your transformation package.

pipeline = dlt.pipeline(
pipeline_name='pipedrive',
destination='bigquery',
dataset_name='pipedrive_dbt'
)

# make or restore venv for dbt, using latest dbt version
venv = dlt.dbt.get_venv(pipeline)

# get runner, optionally pass the venv
dbt = dlt.dbt.package(
pipeline,
"pipedrive/dbt_pipedrive/pipedrive", # or use public git "https://github.com/dbt-labs/jaffle_shop.git"
venv=venv
)

# run the models and collect any info
# If running fails, the error will be raised with full stack trace
models = dbt.run_all()

#optionally log dbt status
pipeline.run([models],
write_disposition="append",
table_name="_models_log")

In conclusion

ETL vs ELT was never really a debate. With some exceptions almost everyone transforms the data in SQL - but what they call this process depends on who's telling the story.

While it's easier to do most of the transformation in SQL, the tedious is completely automatable in python, and the dirty data doesn't need manual normalisation. With dlt, you can do ETL or ELT, or even better, both, as EtLT

Or, if you're feeling funny, you can add duckdb in the middle and go full EtLTLT where you have an additional T step in the middle for the kinds of operations that could be done locally. And afterwards you could load to operational systems to add one more L to the name :)

Fundamentally, we all agree it's all ETL, with the flavors simply designating specific sub-types.

Start using dlt today

What are you waiting for?

This demo works on codespaces. Codespaces is a development environment available for free to anyone with a Github account. You'll be asked to fork the demo repository and from there the README guides you with further steps.
The demo uses the Continue VSCode extension.

Off to codespaces!

DHelp

Ask a question

Welcome to "Codex Central", your next-gen help center, driven by OpenAI's GPT-4 model. It's more than just a forum or a FAQ hub – it's a dynamic knowledge base where coders can find AI-assisted solutions to their pressing problems. With GPT-4's powerful comprehension and predictive abilities, Codex Central provides instantaneous issue resolution, insightful debugging, and personalized guidance. Get your code running smoothly with the unparalleled support at Codex Central - coding help reimagined with AI prowess.